Pole Barn Framing: What It Is, How It Works, & Why It’s a Smart Choice
Pole barn framing, often referred to as post-frame construction, has become a go-to choice for anyone looking to build quickly without sacrificing strength or long-term value. Originally popular in agricultural settings, this method is now widely used for everything from horse barns and garages to hobby shops and multi-use backyard buildings. Its appeal lies in a simpler structural system that reduces the need for a full traditional foundation while still delivering reliable performance.
At Premier Building Solutions, every pole barn is built with flexibility in mind. No two projects are exactly alike, which is why our designs are tailored to match how the space will actually be used. Whether you are planning a wide-open garage or a fully insulated workshop you can use year-round, there are options to match both function and style.
This guide breaks down the essentials of pole barn framing, including how the structure comes together, the materials involved, and what makes it such a practical choice for property owners. If you are ready to explore your options, take a look at our pole barns for sale in Virginia or reach out for a free quote to get started.
Pole barn framing takes a different approach than traditional construction by eliminating the need for a full foundation or basement. Instead, it relies on pressure-treated posts set deep into the ground and secured with concrete, creating a strong and adaptable structure that performs well in a variety of conditions while keeping build time and costs lower.
Because of its flexibility, pole barn construction is used for many different purposes, including:
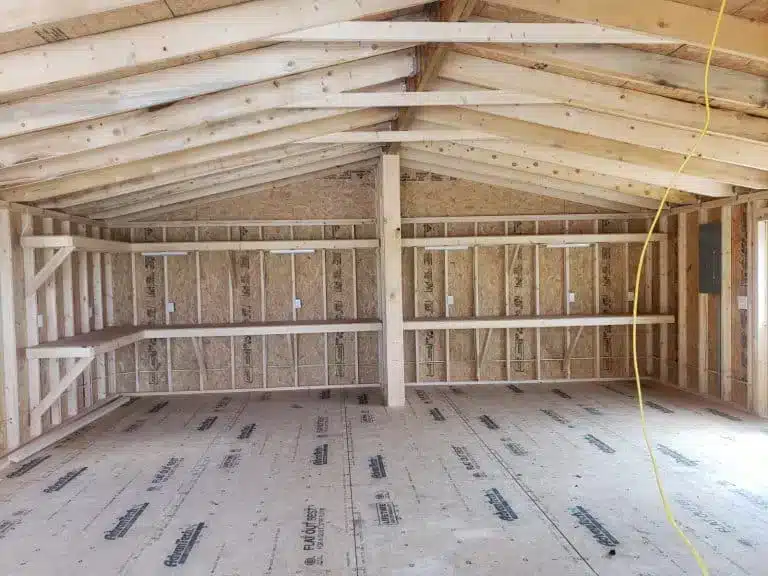
Pole barn construction works so well because each component plays a specific role in strength, stability, and longevity. Here is a breakdown of the core elements that make up a well-built structure:
Posts (Poles)
Serve as the main vertical support for the entire structure
Typically made from pressure-treated wood or steel
Set deep into the ground and secured with concrete
Common sizes range from 4×4 to 8×8, depending on the build
Footings & Foundation
Built by digging holes around 4 feet deep for each post
Posts are anchored using concrete or compacted gravel
Concrete pad options with brackets can be used for added support
Provides a stable base without the need for a full traditional foundation
Girts (Wall Framing)
Horizontal framing members attached to the posts
Support exterior walls and improve structural rigidity
Act as the base for siding installation
Common sizes include 2×4, 2×6, and 2×8
Trusses & Purlins
Trusses span across the top of the structure to support the roof
Designed in a triangular shape for strength and load distribution
Purlins run perpendicular to trusses and support roofing panels
Together, they create a solid and stable roof system
Siding & Roofing
Metal panels are commonly used for durability and weather resistance
Wood and vinyl siding options are also available
Roofing can include metal panels or asphalt shingles, depending on preference
Protects the structure from the elements while defining its appearance
Fasteners
Includes galvanized screws or stainless steel hardware
Designed to resist corrosion and prevent rust over time
Critical for maintaining long-term structural integrity
Skirt Board (Splash Board)
Installed along the base of the wall framing
Made from pressure-treated wood
Protects against moisture, rot, and impact damage
Helps anchor the siding securely to the structure
Insulation & Vapor Barriers (Optional)
Improves temperature control and overall energy efficiency
Options include spray foam, fiberglass batts, or rigid foam
Vapor barriers help reduce condensation and moisture buildup
Ideal for workshops, garages, or living spaces
Interior Liner Panels (Optional)
Installed on interior walls for a finished appearance
Common materials include metal or plywood
Protect insulation and improve durability inside the building
Creates a cleaner and more polished interior space
If you are thinking about building your own, explore our custom pole barn options to design a structure that fits your needs. You can also browse our project gallery to see real builds across Virginia and get inspiration for your project. For long-term performance, do not miss our guide on pole barn maintenance tips to keep your structure in top condition.
How the Pole Barn Framing Process Works
Building a pole barn follows a straightforward process, but each step is important to ensure the structure is strong, level, and built to last. Here is how it typically comes together:
Site preparation and ground leveling to create a stable base for construction
Setting posts in place using concrete footings or compacted gravel backfill
Installing girts, skirt boards, and completing the wall framing
Placing and securing roof trusses across the structure
Adding purlins, followed by roof panels and exterior siding
Installing doors, windows, and any interior finishes as needed
No two builds are exactly the same. Whether it is a basic equipment barn or a fully finished garage with a dedicated workshop space, each structure is designed around how it will be used.
Pole Barn vs. Stick-Built Construction: Which One is Right for You?
Choosing between pole barn and stick-built construction comes down to your budget, timeline, and how you plan to use the building.
At Premier Building Solutions, we specialize in pole barns known for their durability, cost efficiency, and flexibility across agricultural, commercial, and residential projects. But how do they stack up against traditional stick-built methods? Let’s take a quick look at the key differences.
Framing & Structure
Pole Barn Framing: Relies on pressure-treated posts set deep into the ground, which act as the main structural support and remove the need for a full foundation
Stick-Built Framing: Uses vertical wood studs anchored to a continuous foundation such as a concrete slab or basement, with the walls carrying the structural load
Foundation & Site Prep
Pole Barn: Does not require a full foundation, since posts are anchored directly into the ground. This makes it a practical option for uneven terrain and rural properties
Stick-Built: Requires a continuous foundation, such as a concrete slab or basement, leading to more site prep, higher costs, and longer build times
Cost & Budget
Pole Barn: Typically more affordable due to fewer materials, reduced labor, and no need for a full foundation
Stick-Built: Generally more expensive because of added materials like drywall, insulation, and sheathing, along with foundation costs
Construction Speed
Pole Barn: Faster to build because there’s no waiting on foundation curing, and fewer materials are needed.
Stick-Built: Takes longer due to the foundation, framing, and finishing work.
Insulation & Energy Efficiency
Pole Barn: Can be insulated, but sealing gaps around posts may take extra effort. Metal siding and roofing are common.
Stick-Built: Typically better insulated due to layered walls and a tighter building envelope.
Best Uses
Pole Barns: Perfect for farm buildings, garages, workshops, and even homes where cost, speed, and flexibility matter.
Stick-Built Homes: The go-to choice for traditional houses and buildings that require full insulation, long-term durability, and finished interiors.
If you’re considering one for residential or commercial use, make sure to review our Pole Barn Permits in Virginia Guide to understand zoning and code requirements.
Pros and Cons of Pole Barn Framing
Pros of Pole Barn Framing
Cost-Effective Construction
Requires fewer materials than traditional stick-built structures
Lower labor costs due to a simpler building process
No need for a full basement or concrete foundation
Overall, a more budget-friendly construction option
Faster Build Time
Uses pre-engineered components for quicker assembly
Fewer structural elements streamline the process
Projects can be completed faster compared to traditional builds
Versatility & Customization
Open floor plans remove the need for load-bearing interior walls
Ideal for a wide range of uses, including agriculture, storage, workshops, homes, and commercial spaces
Easily expandable, making it simple to add more space in the future as needs grow
Durability & Strength
Built to handle harsh weather conditions, including strong winds and heavy snow
Deep-set posts provide added stability and structural flexibility
Performs well in areas with shifting or uneven soil conditions
Designed for long-term durability with minimal structural issues over time
Cons of Pole Barn Framing
Limited Basement & Crawl Space Options
Not typically designed to include basements like traditional builds
Crawl space options are limited or not feasible in most cases
Concrete flooring is often added after construction, which can increase total costs
Condensation & Moisture Control Issues
May require vapor barriers and proper drainage systems
Poor insulation or ventilation can lead to moisture buildup
Increased risk of mold, rust, or wood rot if not properly managed
Zoning & Building Code Restrictions
Local regulations may require design adjustments or additional engineering
Permit requirements can vary depending on location
Some areas may require upgrades for wind load or foundation standards to meet code compliance
Pole Barn FAQ
What sizes are available for pole barns?
Pole barns can vary widely in size. Common dimensions include 30′ x 40′, 40′ x 60′, and 40′ x 40′. Building in increments of 8, 9, or 10 feet is typically more cost-effective due to standard post spacing.
How far apart should pole barn frame posts be?
The standard spacing between pole barn posts is 8 feet. However, depending on factors such as building size and local conditions, this distance may range from 6 to 10 feet.
How deep should pole barn posts be set?
Typically, pole barn posts should be buried 3 to 4 feet deep, depending on your local frost line and building codes. This depth ensures structural stability and helps resist shifting or frost heave over time.
Is a concrete foundation required for a pole barn?
No. One of the key advantages of pole barn construction is that it doesn’t require a full concrete foundation. Posts are set directly into the ground with concrete footings or compacted gravel. However, many customers choose to add a concrete slab floor after framing is complete.
How long does it take to build a pole barn?
Most pole barns can be built in 1 to 3 weeks, depending on size, weather, and customization. Because there’s no full foundation curing required, pole barn framing is significantly faster than stick-built construction.
Can you insulate a pole barn?
Yes! Pole barns are highly customizable and can be insulated using spray foam, fiberglass batts, or rigid foam boards. Proper insulation and vapor barriers help regulate temperature and reduce moisture buildup, making them great for workshops or garages.
Do I need a permit to build a pole barn?
Yes, most counties require a building permit for pole barn construction. Permit rules vary by state and local zoning laws. At Premier Building Solutions, we help guide you through the process to ensure your structure meets all code requirements.
Ready to Bring Your Pole Barn Vision to Life?
Ready to bring your pole barn project to life? Now that you have a clear understanding of how pole barn framing works, the next step is finding the right team to make it happen. At Premier Building Solutions, we design and build custom pole barns across Virginia, with options to match your specific needs and style. You can also browse our project gallery for ideas and real examples.